Technical Guide:
Configuring and Using Dynamic Word
Overview
Dynamic Word allows for bi-directional synchronization between the Novidea platform and Microsoft Word. This guide covers the initial system configuration, template setup, audit capabilities, and the end-user workflow for editing and managing documents.
Part 1: System Configuration (Administrators)
Before users can utilize Dynamic Word, the feature must be enabled and configured within the System Settings.
1. Global Settings & Activation
Navigate to the System Settings tab within the Novidea/Salesforce setup menu.
Scroll to the Download Files section.
Click Activate.
2. Configuration Parameters
The following settings control the behavior of the Add-in, versioning, and file saving logic.
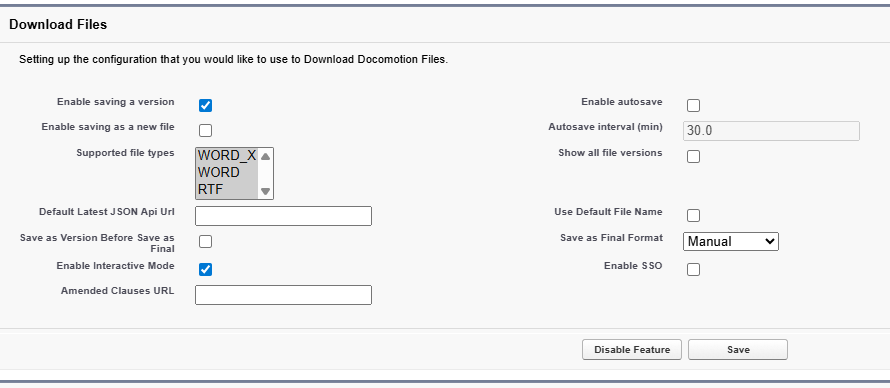
| Setting Name | Definition & Function |
|---|---|
| Enable saving a version | Allows the user to save a version of the document available within the Add-in context. |
| Enable saving as a new file | Controls ability to create a "Clone" version |
| Supported file types | Select file types: .doc, .docx, .rtf |
| Save as version before save as final | Automatically saves a version before "Save as Final". |
| Enable interactive mode | Toggles the ability for the organization to utilize Interactive Mode. |
| Enable auto save | Allows to auto-save at specific intervals. |
| Autosave interval(min) | Enter time for the autosave interval in minutes |
| Show all file verions | xxx xxx |
| Use default file name | Use defualt file name |
| Save as final format | Defines output format. Options: Manual, or PDF. |
| Enable SSO | Permits Single Sign-On (SSO) authentication when logging into the Add-in. |
Part 2: Template & Designer Configuration
When building a Docomotion form, specific definitions are required to enable “Push Back” capabilities (bi-directional syncing).
1. Template Definition (Form Creation)
This configuration is established during the initial creation of the Form/Template.
Action: When creating a new Form record in Salesforce/Novidea.
Definition: You must define/select Dynamic Process as the specific process type for this template. This designates the template as compatible with the bi-directional sync features from the start.
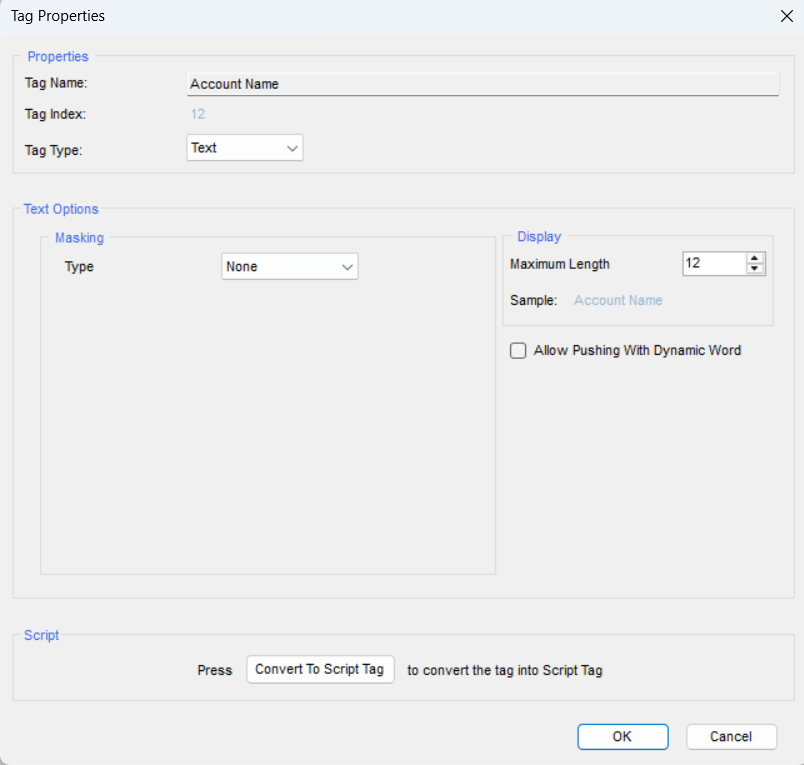
2. Field Permissions (Push Back Logic)
To ensure data integrity, fields are read-only by default. Configuration is done within the Docomotion Designer in Word.
Locate the Field: Select the data tag on the left-upper window.
Tag Properties: Open the Tag Properties window.
Enable Push Back: In the Text Options section, check the box for Allow Pushing With Dynamic Word.
Part 3: Accessing the Add-in
Once the document is generated via Docomotion and downloaded:
Open the Word document.
Launch the Dynamic Word add-in from the ribbon.
Login: Enter Salesforce credentials or use SSO (if Enable SSO is active in System Settings).
Part 4: Using Dynamic Word (Modes)
The add-in operates in two distinct modes.
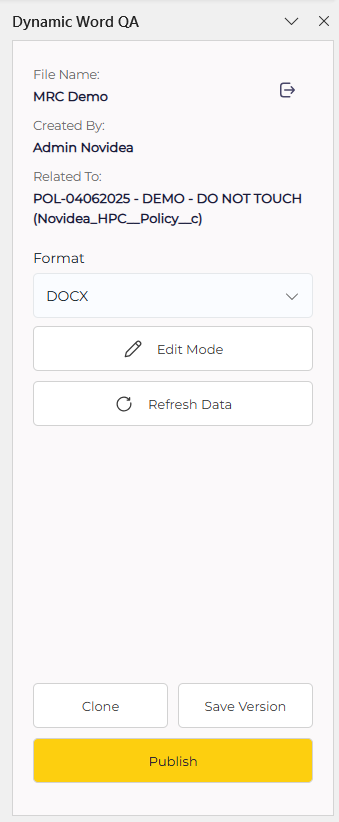
1. General Mode (Lifecycle Management)
Used for managing the document’s lifecycle
Save Version: Saves the current state back to the system as a dynamic draft (Work-in-Progress).
Clone (Save New File): Creates a duplicate of the current document context for a new record (dependent on the Save new file setting).
Publish (Save as Final): Finalizes the changes. This locks the document and generates the final output (PDF/Word/PDF+Word).
2. Edit Mode (Data Interaction)
To modify data, switch to Edit Mode. The add-in refreshes to sync with the latest record data.
Navigation: Use the Previous/Next buttons to jump between permitted fields.
Updates: Enter values via the Sidebar or directly on the Word canvas.
Auto-Save: If configured, the system will save changes automatically at the set interval.
Part 5: Auditing and Logs (The Logger)
To ensure compliance, the system maintains a robust audit trail via Dynamic Responses list. Any generation creates a log, and any change in the form creates a Dynamic Response record.
Log Capabilities
Trigger: Logs are generated automatically upon any field update.
Related Lists: Each Dynamic Response contains a related list of all fields updated during that session.
Data Comparison (Audit Trail)
Data Before vs. After: View the specific value change.
Date Tracking: Logs display the Previous Date versus the New Date.
User Attribution: The log explicitly records Last Modified By and Created By to identify exactly who made the change.